You are browsing unreleased documentation.
The OpenID Connect plugin can be integrated with the ACL plugin, which provides
access control functionality in the form of allow and deny lists.
You can also pair ACL-based authorization with
Kong consumer authorization.
Prerequisites
In most cases, the OpenID Connect plugin relies on a third party identity provider (IdP).
The examples in this guide use Keycloak as a sample IdP.
Expand the following sections to configure Keycloak and Kong Gateway.
Configure Keycloak
All the *.test domains in the following examples point to the localhost (127.0.0.1 and/or ::1).
We use Keycloak as the identity provider in the following examples,
but the steps will be similar in other standard identity providers. If you encounter
difficulties during this phase, refer to the Keycloak documentation.
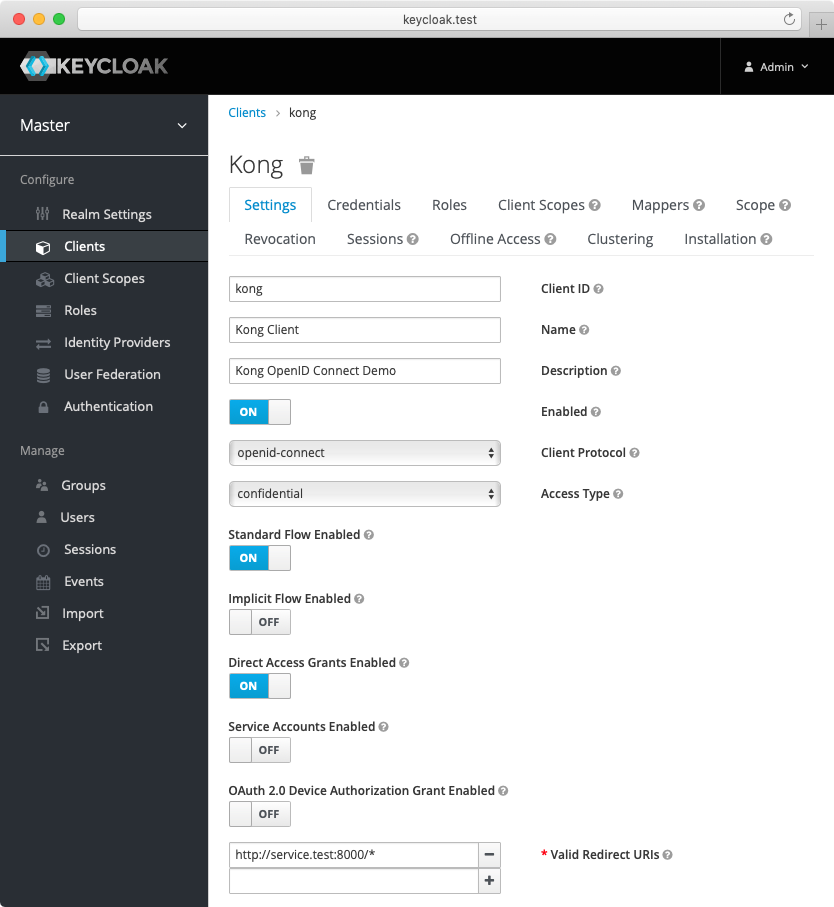
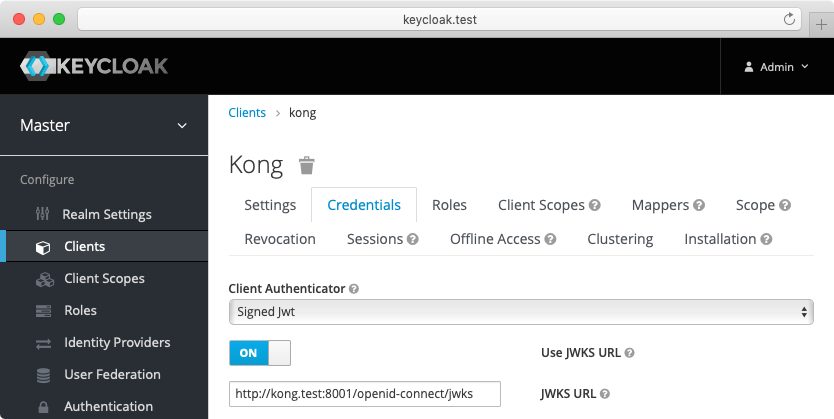
- Create a confidential client
kong with private_key_jwt authentication and configure
Keycloak to download the public keys from [the OpenID Connect Plugin JWKS endpoint][json-web-key-set]:
-
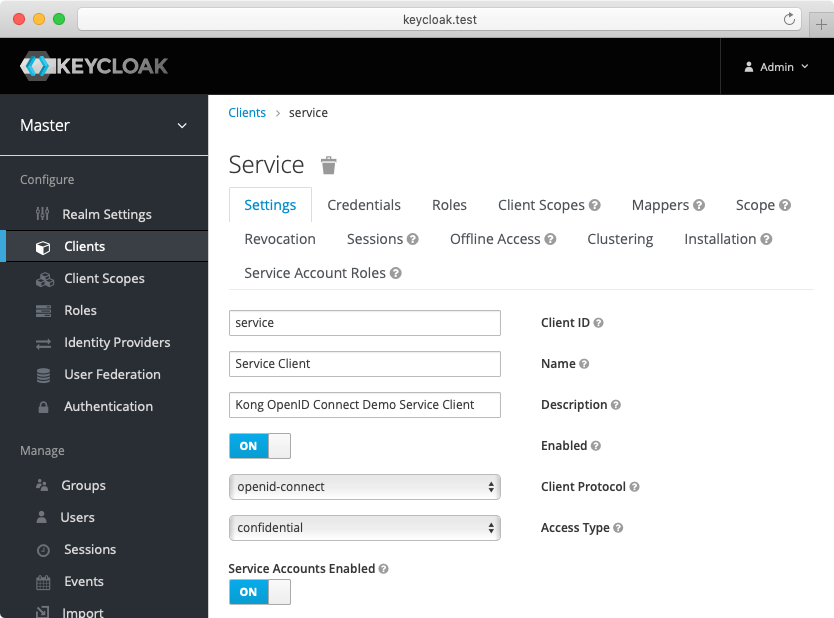
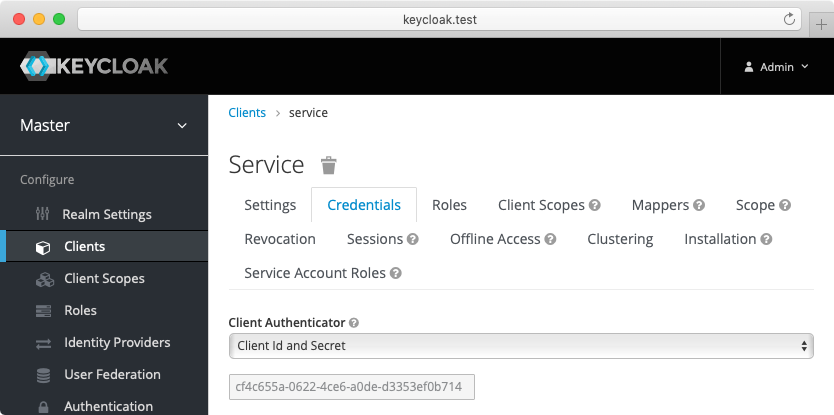
Create another confidential client service with client_secret_basic authentication.
For this client, Keycloak will auto-generate a secret similar to the following: cf4c655a-0622-4ce6-a0de-d3353ef0b714.
Enable the client credentials grant for the client:
-
(Optional) Create another confidential client cert-bound with settings similar to the service client created previously.
From the Advanced tab, enable the OAuth 2.0 Mutual TLS Certificate Bound Access Tokens Enabled toggle.
-
(Optional, to test mTLS Client Authentication) Create another confidential client client-tls-auth with settings similar to the service client created above.
From the Credentials tab, select the X509 Certificate Client Authenticator and fill the Subject DN field so that it matches the Kong client certificate’s, e.g.: CN=JohnDoe, OU=IT.
-
(Optional, to test Demonstrating Proof-of-Possession Client Authentication) Create another confidential client client-dpop-auth with settings similar to the service client created above.
From the Advanced tab, enable theOAuth 2.0 DPoP Bound Access Tokens Enabled toggle.
- Create a verified user with the name:
john and the non-temporary password: doe that can be used with the password grant:
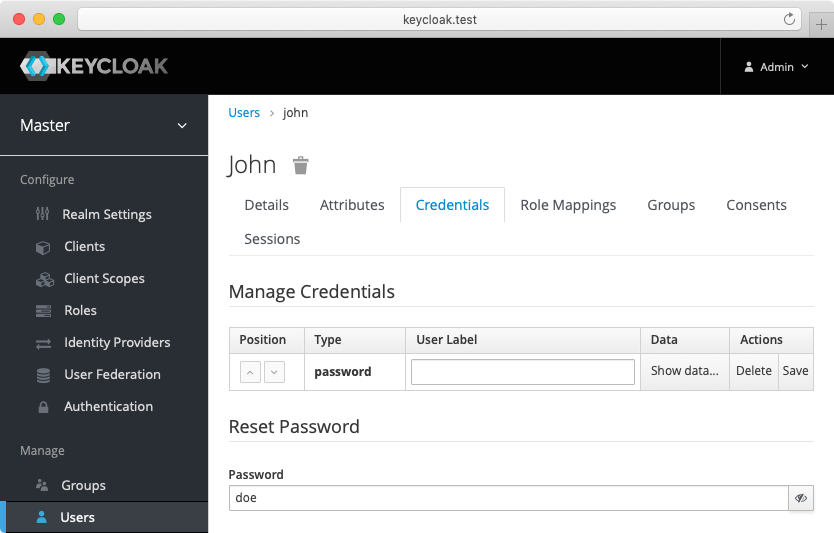
Alternatively you can download the exported Keycloak configuration,
and use it to configure the Keycloak. Please refer to Keycloak import documentation
for more information.
You need to modify Keycloak standalone.xml configuration file, and change the socket binding from:
<socket-binding name="https" port="${jboss.https.port:8443}"/>
to
<socket-binding name="https" port="${jboss.https.port:8440}"/>
The Keycloak default https port conflicts with the default Kong TLS proxy port,
and that can be a problem if both are started on the same host.
Note: The mTLS Client Authentication, along with the proof of possession feature that validates OAuth 2.0 Mutual TLS Certificate Bound Access Tokens, both require configuring Keycloak to validate client certificates with mTLS using the --https-client-auth=request option, and to configure TLS appropriately, including adding the trusted client certificates to the truststore. For more information, refer to the Keycloak documentation.
Configure Kong Gateway
-
Create a service:
 curl -i -X POST http://localhost:8001/services \
   --data "name=openid-connect" \
   --data "url=https://httpbin.konghq.com/anything"
-
Create a route:
 curl -i -X POST http://localhost:8001/services/openid-connect/routes \
   --data "name=openid-connect" \
   --data "paths[]=/"
ACL plugin authorization
The following examples are built with simplicity in mind, and
are not meant for a production environment.
Because httpbin.konghq.com is the upstream service in these examples, we highly
recommended that you do not run these examples with a production identity
provider as there is a high chance of leaking information.
The examples also use the plain HTTP protocol, which you should
never use in production.
First, configure the OpenID Connect plugin for integration with the ACL plugin.
For the purposes of the demo, you can use the
password grant.
Kong Admin API
Konnect API
Kubernetes
Declarative (YAML)
Konnect Terraform
Make the following request:
curl -X POST http://localhost:8001/services/{serviceName|Id}/plugins \
    --header "accept: application/json" \
    --header "Content-Type: application/json" \
    --data '
    {
  "name": "openid-connect",
  "config": {
    "issuer": "http://keycloak.test:8080/auth/realms/master",
    "client_id": [
      "kong"
    ],
    "client_auth": [
      "private_key_jwt"
    ],
    "auth_methods": [
      "password"
    ],
    "authenticated_groups_claim": [
      "scope"
    ]
  }
}
    '
Replace SERVICE_NAME|ID with the id or name of the service that this plugin configuration will target.
Make the following request, substituting your own access token, region, control plane ID, and service ID:
curl -X POST \
https://{us|eu}.api.konghq.com/v2/control-planes/{controlPlaneId}/core-entities/services/{serviceId}/plugins \
    --header "accept: application/json" \
    --header "Content-Type: application/json" \
    --header "Authorization: Bearer TOKEN" \
    --data '{"name":"openid-connect","config":{"issuer":"http://keycloak.test:8080/auth/realms/master","client_id":["kong"],"client_auth":["private_key_jwt"],"auth_methods":["password"],"authenticated_groups_claim":["scope"]}}'
See the Konnect API reference to learn about region-specific URLs and personal access tokens.
First, create a KongPlugin
resource:
echo "
apiVersion: configuration.konghq.com/v1
kind: KongPlugin
metadata:
  name: openid-connect-example
plugin: openid-connect
config:
  issuer: http://keycloak.test:8080/auth/realms/master
  client_id:
  - kong
  client_auth:
  - private_key_jwt
  auth_methods:
  - password
  authenticated_groups_claim:
  - scope
" | kubectl apply -f -
Next, apply the KongPlugin resource to an ingress by annotating the service as follows:
kubectl annotate service SERVICE_NAME konghq.com/plugins=openid-connect-example
Replace SERVICE_NAME with the name of the service that this plugin configuration will target.
You can see your available ingresses by running kubectl get service.
Note:
The KongPlugin resource only needs to be defined once
and can be applied to any service, consumer, or route in the namespace. If you
want the plugin to be available cluster-wide, create the resource as a
KongClusterPlugin instead of KongPlugin.
Add this section to your declarative configuration file:
plugins:
- name: openid-connect
  service: SERVICE_NAME|ID
  config:
    issuer: http://keycloak.test:8080/auth/realms/master
    client_id:
    - kong
    client_auth:
    - private_key_jwt
    auth_methods:
    - password
    authenticated_groups_claim:
    - scope
Replace SERVICE_NAME|ID with the id or name of the service that this plugin configuration will target.
Prerequisite: Configure your Personal Access Token
terraform {
  required_providers {
    konnect = {
      source  = "kong/konnect"
    }
  }
}

provider "konnect" {
  personal_access_token = "kpat_YOUR_TOKEN"
  server_url            = "https://us.api.konghq.com/"
}
Add the following to your Terraform configuration to create a Konnect Gateway Plugin:
resource "konnect_gateway_plugin_openid_connect" "my_openid_connect" {
  enabled = true

  config = {
    issuer = "http://keycloak.test:8080/auth/realms/master"
    client_id = ["kong"]
    client_auth = ["private_key_jwt"]
    auth_methods = ["password"]
    authenticated_groups_claim = ["scope"]
  }

  control_plane_id = konnect_gateway_control_plane.my_konnect_cp.id
  service = {
    id = konnect_gateway_service.my_service.id
  }
}
Before applying the ACL plugin, test the OpenID Connect plugin configuration:
curl --user user:pass http://localhost:8000
You should get an HTTP 200 response with an X-Authenticated-Groups header:
{
    "headers": {
        "X-Authenticated-Groups": "openid, email, profile",
    }
}
The following examples show how to enable ACL deny or allow lists with OpenID Connect.
You can also have both allow and deny lists configured at the same time.
Add the ACL plugin to the openid-connect service and configure the allow parameter:
Kong Admin API
Konnect API
Kubernetes
Declarative (YAML)
Konnect Terraform
Make the following request:
curl -X POST http://localhost:8001/services/{serviceName|Id}/plugins \
    --header "accept: application/json" \
    --header "Content-Type: application/json" \
    --data '
    {
  "name": "acl",
  "config": {
    "allow": [
      "openid"
    ]
  }
}
    '
Replace SERVICE_NAME|ID with the id or name of the service that this plugin configuration will target.
Make the following request, substituting your own access token, region, control plane ID, and service ID:
curl -X POST \
https://{us|eu}.api.konghq.com/v2/control-planes/{controlPlaneId}/core-entities/services/{serviceId}/plugins \
    --header "accept: application/json" \
    --header "Content-Type: application/json" \
    --header "Authorization: Bearer TOKEN" \
    --data '{"name":"acl","config":{"allow":["openid"]}}'
See the Konnect API reference to learn about region-specific URLs and personal access tokens.
First, create a KongPlugin
resource:
echo "
apiVersion: configuration.konghq.com/v1
kind: KongPlugin
metadata:
  name: acl-example
plugin: acl
config:
  allow:
  - openid
" | kubectl apply -f -
Next, apply the KongPlugin resource to an ingress by annotating the service as follows:
kubectl annotate service SERVICE_NAME konghq.com/plugins=acl-example
Replace SERVICE_NAME with the name of the service that this plugin configuration will target.
You can see your available ingresses by running kubectl get service.
Note:
The KongPlugin resource only needs to be defined once
and can be applied to any service, consumer, or route in the namespace. If you
want the plugin to be available cluster-wide, create the resource as a
KongClusterPlugin instead of KongPlugin.
Add this section to your declarative configuration file:
plugins:
- name: acl
  service: SERVICE_NAME|ID
  config:
    allow:
    - openid
Replace SERVICE_NAME|ID with the id or name of the service that this plugin configuration will target.
Prerequisite: Configure your Personal Access Token
terraform {
  required_providers {
    konnect = {
      source  = "kong/konnect"
    }
  }
}

provider "konnect" {
  personal_access_token = "kpat_YOUR_TOKEN"
  server_url            = "https://us.api.konghq.com/"
}
Add the following to your Terraform configuration to create a Konnect Gateway Plugin:
resource "konnect_gateway_plugin_acl" "my_acl" {
  enabled = true

  config = {
    allow = ["openid"]
  }

  control_plane_id = konnect_gateway_control_plane.my_konnect_cp.id
  service = {
    id = konnect_gateway_service.my_service.id
  }
}
Test the configuration with both plugins enabled:
curl --user user:pass http://localhost:8000
You should get an HTTP 200 response.
Add the ACL plugin to the openid-connect service and configure the deny parameter:
Kong Admin API
Konnect API
Kubernetes
Declarative (YAML)
Konnect Terraform
Make the following request:
curl -X POST http://localhost:8001/services/{serviceName|Id}/plugins \
    --header "accept: application/json" \
    --header "Content-Type: application/json" \
    --data '
    {
  "name": "acl",
  "config": {
    "deny": [
      "openid"
    ]
  }
}
    '
Replace SERVICE_NAME|ID with the id or name of the service that this plugin configuration will target.
Make the following request, substituting your own access token, region, control plane ID, and service ID:
curl -X POST \
https://{us|eu}.api.konghq.com/v2/control-planes/{controlPlaneId}/core-entities/services/{serviceId}/plugins \
    --header "accept: application/json" \
    --header "Content-Type: application/json" \
    --header "Authorization: Bearer TOKEN" \
    --data '{"name":"acl","config":{"deny":["openid"]}}'
See the Konnect API reference to learn about region-specific URLs and personal access tokens.
First, create a KongPlugin
resource:
echo "
apiVersion: configuration.konghq.com/v1
kind: KongPlugin
metadata:
  name: acl-example
plugin: acl
config:
  deny:
  - openid
" | kubectl apply -f -
Next, apply the KongPlugin resource to an ingress by annotating the service as follows:
kubectl annotate service SERVICE_NAME konghq.com/plugins=acl-example
Replace SERVICE_NAME with the name of the service that this plugin configuration will target.
You can see your available ingresses by running kubectl get service.
Note:
The KongPlugin resource only needs to be defined once
and can be applied to any service, consumer, or route in the namespace. If you
want the plugin to be available cluster-wide, create the resource as a
KongClusterPlugin instead of KongPlugin.
Add this section to your declarative configuration file:
plugins:
- name: acl
  service: SERVICE_NAME|ID
  config:
    deny:
    - openid
Replace SERVICE_NAME|ID with the id or name of the service that this plugin configuration will target.
Prerequisite: Configure your Personal Access Token
terraform {
  required_providers {
    konnect = {
      source  = "kong/konnect"
    }
  }
}

provider "konnect" {
  personal_access_token = "kpat_YOUR_TOKEN"
  server_url            = "https://us.api.konghq.com/"
}
Add the following to your Terraform configuration to create a Konnect Gateway Plugin:
resource "konnect_gateway_plugin_acl" "my_acl" {
  enabled = true

  config = {
    deny = ["openid"]
  }

  control_plane_id = konnect_gateway_control_plane.my_konnect_cp.id
  service = {
    id = konnect_gateway_service.my_service.id
  }
}
Try accessing the proxy:
curl --user john:doe http://localhost:8000
You should get an HTTP 403 Forbidden response, and the following message:
{
    "message": "You cannot consume this service"
}


